
Practical Skills
To start off this project, what I wanted to do was to get all the basics of the game, like movement, level design and any other "basic" game features done just so I can at least get an understanding of the engine I'm using, that being game maker studio 2. So since the start of the project I have managed to get a character "sprite", which for now is just a square, due to the fact that I don't want to spend a lot of time at the start of the project working on learning how to pixel art, as I think that would be a waste of time at the beginning. Some examples of what I have created already are below, for now it is only simple things that will be replaced in future.
As you can see in the video currently everything I have is all solid colours as a temporary placeholder for the future final sprites. From the clip some of the basic things I did was just set a camera that follows the player (which gives the side scrolling effect, as well as gave the player movement and collision with the pieces of land its supposed to have collision with, as well as lock the camera so the player cannot see through the walls at either side of the level. Code snippets are below.
Camera Code

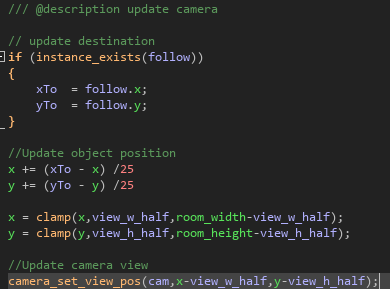
To the right is a screenshot of the rest of the code for the camera, this is whats behind the camer actually following the player sprite aswell as positioning itself as to not go through the wall via "clamping" to the edges set in the rooms viewport.
To the left is a screenshot of the variables i used while making the camera that would follow the player, as with most variables, they are not needed however it makes it easier to manage and change some aspects of the code in future if i need to.
Player Code

To the right is a screenshot of the rest of the code for the player which is behind everything important for the player sprite. For example, i started by setting the keybinds the player will be using the move and jump. After which i moved on to using some calculations so the game is able to calculate the speed at which the player should be moving when a key is pressed. For the first IF statement you can see in the image is for checking if the player is on the object "objWall" which is the parent object used for anything i want the player to be able to walk on and not fall through. Finally, as the notes are saying i then eventually got to making it so the player can actually move as long as they are on the object "objWall" which again is a parent object meaning anything that is a child to that object also counts as the parent object.
To the left is a screenshot of the variables i used while making the player sprite and setting its speeds and gravity. hsp is for the horizontal speed, vsp is for the vertical speed, grv is for gravity and walksp is obviously for the walk speed of the player.

Level Updates (21/03/2022)
For this day in development I wanted to be working more on the level design and the pixel art and making the first level (aka the tutorial level) look pretty. The first thing I did was look on google to try find a tileset for a nice forest level. For those who don't know the term tileset, it is a sprite of which contains sprites that connect in such a way which allows you to just "paint" the landscape how you want it with ease. From the video below you can also see i have made a rough pixel art of the key and hatch which will be used in most if not all levels of the game. Other than those you can also see i have the tileset as well as level setup and ready for other mechanics. Things i have left to do until i have a functioning level/game would be to work on a menu screen, make the key able to be picked up, aswell as a win condition (in my case finding the key and hatch to escape.)
As for the menu screen part of my to-do list, that will probably have to be a thing i do nearer the end due to the fact it is not a needed part of the game and could be done at a later date as it has nothing to do with actual gameplay.
Game Updates (24/03/2022)
Today i wanted to work on getting a win condition done for the game so it is a playable "winnable" game. So I set out today to make it work as follows. Player starts game, hatch and key spawned in level, player cannot escape the level if the key object still exists in the level anywhere. The reason I wanted to get this done today was because this is arguably the most important feature of the game and getting it done now would make it easier to manage levels in the future.
As you can see in this video below when I run over the hatch and the key still exists I cannot win, however when I run over the hatch after picking up the key it goes to the next level/room created allowing the player to proceed onto the next level.
The code behind this feature was actually very simple and I was able to get it done in about 30 minutes.
To start with I of course had to setup a collision event so that the game can do something when the player object is overlapping whichever object I want to have a reaction. So for example I went into the "objPlayer" object which was previously mentioned in this page which will be everything to do with the final player model when I have a sprite for it and what I did was setup the collision event so the game can recognise when the player object is overlapping the object for the hatch as well as the object for the key. Once that was setup all I had to do was make it do the key was "deleted" from the level when the player was overlapping it, this just removes the key from the level but only for that game, once the game is restarted the key will be back of course.

The other thing that was needed to do was to create the hatch moving the player to the next level if the player has picked up the key. The was I did this was very simple. All I did was setup collision for the player and the hatch and put code in the block that will only be triggered if the player is overlapping the hatch and has the key, if the player does not have the key then stepping into the hatch will do nothing. The way i did this was by making the game run a check for if the object "objKey" existed in the level the player was in, if it does exist then the game does nothing, however if the key does not exist then the game will realise that and run the code set in the block which just moves the player onto the next level.

Eventually i will have the code also set to run a sound or a popup or something similar just to add a little more sense of achievement when the player picks up the key and/or moves on to the next level.
Game Updates (05/04/2022)
After a bout a week of working on the character model I finally have a sprite with interactive animations including, walking, jump and idle. Below there is a gif of my characters walk animation as well as the strip which i imported in to get the animation working. As of current is it kind of a placeholder sprite which I plan on recolouring in some way in the future to make it more my own however for now I think it is good and I like how the animations turned out.
The main issues I had when creating these animations did no fall within the code itself, it fell within the sprite sizing's as they were all slightly different sizes due to the auto importing the strip after editing it in photoshop.

Below is the code that is behind the animation working in game, because of course just getting the animation is only step 1 getting the code is the main part that needed doing and you can see that as well as the animation in game below.

Basically all this game is set out to do is a few checks of what the player is doing and then runnning specific code depending on what check returns true. So for example if the player is not touching the object "objWall" then it will turn the sprite of the player into "sPlayerJump" which plays the jump animations of course. If this check returns false, meaning the player is touching the wall, and if the players HSP (horizontal movement speed) is equal to 0, meaning they are stood still, it will change the active sprite to the idle sprite which is just the player standing still. The final check is if the player is touching the wall object but has a HSP higher than 0 it will play the running animations as having a hsp of higher than 0 means the player is moving.
Game Updates (07/04/2022)
In todays lesson I wanted to see if I can get the powerups working for the future levels as it could be quite an important part of the game making certain parts of parkour possible that would be otherwise impossible. For example, with these powerups I can make harder and longer/higher jumps that the player would be required to find the specific powerup in order to complete the level.
The initial plan was to use a coin system where the player would have to buy the ability for double jumps and more a speed however I like the idea of item pickup powerups as it incentivises the player to explore the level more, item pickups also allow for further expansion of powerups like grow and shrink powerups for example.
Below is a clip showcasing the different powerups and their uses.

The code block to the left is the code behind making the player be able to double jump/multi jump. All it does is check if the player variable "canMultiJump" is true, which happens when the power up is picked up, and if they press space then the game makes away 1 jump from the given 2 jumps and the player can jump again to remove both jumps meaning the player cannot jump anymore. The last part is just to set the players jump limit to 2 meaning the player gains a jump whenever they touch the floor to stop the game removing all jumps and making the player unable to jump.
The code within the powerup object itself just sets the variable "canMultiJump" to true which starts off the whole multi jumping code after that an alarm runs which turns the multi jump variable back to false.
The code to the right is a lot more simple than the double jumping code as there is no need to check anything other than if the player has collided with the powerup object. So all this does is when the player collides with the SpeedUP object it sets the movement speed to the variable for walksp_powerup (which is 6) and then runs an alarm which will revert the speed back to normal after 5 seconds.

Game Updates (29/04/2022)
After the small set back of losing a few weeks worth of work for my project I was trying to get that done as quick as possible which i managed to do in the end as well as started working on another small feature.
Today i started working on a pause feature. At the minutes its in heavy beta and all it does is basically disable all the assets in the room which in turn basically disables the player being able to move as well as stops all movement of camera and such too. I want to add a feature to this where it doesn't fully remove the sprites from the scene so you are still able to see in the background where it was you paused as well as make the pause screen look nicer and not just be a screen that says "paused"
Below is a screenshot of the code used to make the pause work along with a recording of it in action.
The "layer_background_speed" ended up not working and was removed after testing, this is an older screenshot.


As can be seen in the video this is a very rough pause feature however I will be updating it very soon to make it look more appealing and handle better for the player.
Game Updates (11/05/2022)
Over this weekend I wanted to move a bit more into the menu screens for my game including an options menu to change the screen resolution but also a main menu screen where u can play the game, quit the game and head to the options tab. This was a lot of work as I had to get used to using the draw GUI event which is something I was yet to use until now. So with the help of some youtube tutorials which I will link below, however you can also find some links I used in the "Bibliography" page of the website. The reason for using the tutorial is due to learning new GUI features as well as wanting to include the transitions in it. Most of the layout is similar to the video as I liked how it looked, but I will have a title in the upper left corner which was not included in the video, as well as the options tab which again was not included in the video.
After a little more work I was able to get the options sorted too allowing the player to play in different resolutions. If they wanted to, my current play while I am working with GUIs would be to work on the pause menu so players can quit from within the game as well as change the resolution from in game etc.
Game Updates (20/05/2022)
As we are getting closer to the deadline of this project I have been kind of speed coding a few things into the game while putting together the first official level. What I wanted to do for this level was making it a lot longer than the other level which is short as its the tutorial level. So as you can see from the image below of its layout it its quite a big level with more varying parkour jumps that involve the double jump feature, as well as the newly coded moving platforms I wanted to include in this game as i enjoy those kind of platforming jumps that require a bit more timing than just normal platform to platform jumping.
I will share an image of the layout below as long as the coding behind the moving platforms as to not spoil how to do the level.

Game Updates (25/05/2022)
Today for me was a very finalised day, all i wanted to get done was polishing some of the features of the game and include some item pickup popups/widgets. So what i was able to do was get a popup after you pickup the double jump showing the player if they have the powerup active. I also coded in a popup in the upper right corner showing the player if they have the key picked up or if they dont so its easier to keep track of it. An image of the code behind this all aswell as the popups themselves are below for you to take a look.

There is a chance that this code looks quite complex to some people however its all easy enough to understand. All the first IF statement is doing is checking if the players "canMultiJump" variable if true, this variable is set to true when the player interacts with the double jump object. When the game can read that variable as true all it does is write some text in the upper right corner of the screen which is white with a black outline saying that the double jump is active.
The next IF and ELSE statements are just checking if the player has picked up the key by interacting with it, if the player has picked it up (which the game checks by seeing it the instance of the key object exists in the level) then it writes text in the corner of the screen right below the powerup text that shows the key as found or not found making it easier for the player to keep track of what they have left to do in the level.


